By default in Windows XP, thumbnails for pictures are enabled when browsing the contents of your computer using My Computer or Windows Explorer. As you might know, the Thumbnails feature can come in handy when browsing through your digital photos and other images. Without the Thumbnails view, you have to open each image individually or use some type of photo software that provides thumbnail browsing.
Enabling thumbnails might affect your PC performance, making browsing through your files and folders a bit slower, which is worse on PCs loaded with lower memory. Therefore, if you don't need to browse through your pictures often or use photo software to view them, think about keeping the Thumbnails feature disabled.
The Thumbnails feature on Windows Vista is disabled by default. Nevertheless, you can easily enable this feature:
1. Double-click on the Computer (or My Computer) icon on your desktop.
If the Computer icon isn't on the desktop, open Windows Explorer by opening the Start Menu, clicking All Programs, choosing Accessories, and clicking Windows Explorer. By default, the Computer icon isn't displayed on the desktop. If you want to add this icon to the desktop
2. Click on the Organize button on your toolbar, and select Folder and Search Options. If your toolbar isn't visible, press one of the Alt buttons on your keyboard to make it appear.
3. Click on the View tab.
4. Uncheck the Always Show Icons, Never Thumbnails option. and then click OK to exit.
Labels: desktop, icons, Thumbnails, Tutorial, vista, vista tips and trick, Windows XP
If you want to use the new search capabilities of the Start menu, you might not want to change to the Classic Start menu, as you'll get rid of this new feature.
If you find it's hard to adapt to this new design, you can apply the Classic Start menu:
1. Right-click on the taskbar and select Properties
2. Click the Start Menu tab.
3. Select the Classic Start menu option, and then click OK to exit.
Labels: icons, Start menu, Tutorial, vista, vista tips and trick, Windows Classic
1. Open the Start menu.
By default, the Network icon isn't displayed on the desktop. If you want to add this icon to the desktop
2. In the Search box, type "regedit", as shown in Figure 4.28, and then press Enter. If you are using the Windows Classic Start menu, you need to click Run, type "regedit", and then click OK.
Be very careful when editing the Windows Registry. Mistakes can cause major problems. By major, I mean everything from a program failing to start to your computer being made unusable. One false move in the Registry can spell disaster, so be careful!
It's also a good idea to make a backup copy prior to making any changes to the Registry. Here's how:
1. Open the Registry Editor by following steps 1 and 2.
2. In the Registry Editor, click File on the menu and select Export.
3. On the bottom of the dialog box, select the All option for the Export Range.
4. Browse, find, and select a location to save the registry. It's best to save it to a removable shortage device like a flash drive, floppy disc, or CD.
5. Enter your desired file name, such as Registry_Backup_DATE.
6. Click Save and wait until it's done which may take a few minutes.
3. Navigate to the following folder:
HKEY_CURRENT_USER\Software\Classes\Local Settings\Software\Microsoft\Windows\Shell\MuiCache
4. Locate and double-click on the following Registry entry:
@C:\Windows\system32\NetworkExplorer.dll,-1
5. Enter your desired name in the Value Data field, as shown in Figure 4.31, and click OK.
6. Close the Registry Editor.
7. To activate the new icon name, right-click anywhere on the desktop and select Refresh. The new icon name should now appear
Here's the simplest way to add the Internet Explorer icon to the desktop:
1. Open the Start menu.
2. Click and drag the Internet Explorer icon to the desktop
3. To get rid of the shortcut text, right-click on the icon, select Rename, and delete the word "Shortcut."
In creating a simple shortcut means you'll have the ugly arrow on the Internet Explorer icon, unlike the other main icons, such as Computer, Network, and Recycle Bin.
Be very careful when editing the Windows Registry. Mistakes can cause major problems. By major, I mean everything from a program failing to start to your computer being made unusable. One false move in the Registry can spell disaster, so be careful!
It's also a good idea to make a backup copy prior to making any changes to the Registry. Here's how:
1. Open the Registry Editor by following steps 1 and 2.
2. In the Registry Editor, click File on the menu and select Export.
3. On the bottom of the dialog box, select the All option for the Export Range.
4. Browse, find, and select a location to save the registry. It's best to save it to a removable shortage device like a flash drive, floppy disc, or CD.
5. Enter your desired file name, such as Registry_Backup_DATE.
6. Click Save and wait until it's done which may take a few minutes.
As you probably noticed, the only icon that's placed on the desktop by default in Windows Vista is the Recycle Bin. However, if you're used to the others (such as My Computer or My Network Places) being on the desktop, you can easily add the other main icons:
1. Right-click on your desktop and select Personalize 
2. Click Change Desktop Icons in the tasks pane on the left ![]()
3. Check the icons you want to appear on the desktop, such as that shown in Figure below, and then click OK to exit.![]()
Labels: desktop, Recycle Bin, Tutorial, vista, vista tips and trick
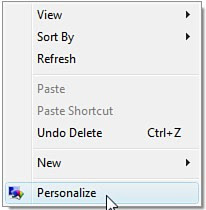
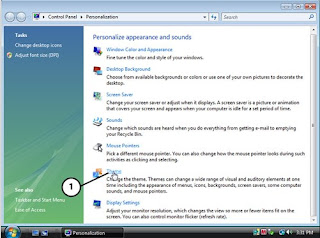
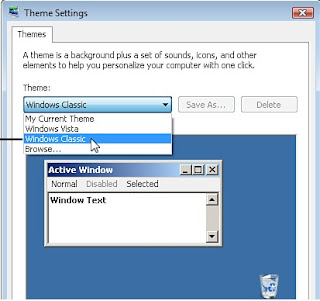
The first task in getting rid of the Vista look and feel is applying the Windows Classic theme:
1. Right-click on your desktop and select Personalize
2. Click on Theme
3. Select Windows Classic from the drop-down list,see figure below and then click OK to exit.
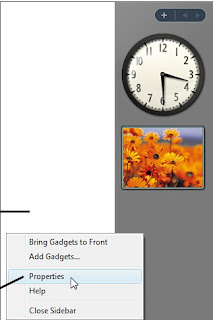
Here's how to disable Windows Sidebar:
1. Right-click on Sidebar Windows and select Properties, as shown in Figure below
2. Uncheck the Start Sidebar when Windows Starts option,
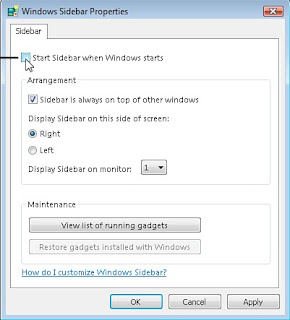
3. Click OK.
If you want to simply close Windows Sidebar without disabling it from coming up at startup, just right-click on the Sidebar and click Close Sidebar.
Labels: gadgets, Tutorial, vista tips and trick, Welcome Center, Windows Sidebar
 The language packs offered by Microsoft for Windows Vista Ultimate allow you to set the entire interface of Windows to another language. It is even user account specific, so you can set different languages for the individual users on the same PC.
The language packs can be downloaded from the Windows Ultimate Extras section on the Windows Update website:
www.update.microsoft.com
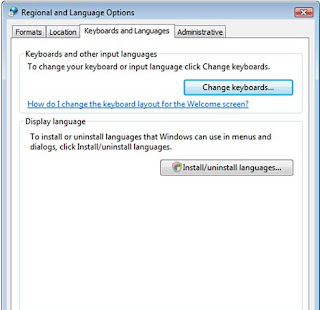
Here's how to access the language settings (such as to remove a language pack):
1. Open the Start menu.
2. Click Control Panel.
3. Double-click the Regional and Language Options icon.
4. Click the Keyboards and Languages tab.
5. Refer to the Display language section,
Labels: language packs, Microsoft, Tutorial, vista ultimate edition
For example, when you accidentally save over a file or notice you've made changes to files that you now regret, you can easily revert to other saved versions. A few clicks and the file will appear just as it did back when it was saved days or months ago.
Shadow Copy works in conjunction with System Protection, and its System Restore features. Therefore, System Protection must be enabled for Shadow Copy to work. Shadow copies of files are made when restore points are saved, typically every day.
The System Protection features are hard-drive independent; therefore, you would need to turn on System Protection for each hard drive and/or partition.
To access the System Protection settings, right-click the Computer icon on the Start menu or desktop, select Properties, and click the System Protection link under the Tasks pane on the left.
Here's how to access the Shadow Copy feature:
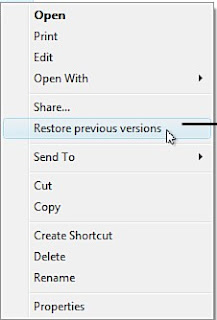
1. Right-click on the file or folder to restore.
2. Select Restore Previous Versions
Labels: fax, scan, vista, Vista Business, Windows XP
1. Vista BootScreen 1.2
2. Vista BoxShot Maker 1.0
3. Vista Business Icon Collection 1.0
4. Vista Business Icon Collection 2
5. Vista Buttons 2.73
6. Vista Caller-ID 1.0.7
7. Vista Controls Icon Collection 1
8. Vista Drives 1.0
9. Vista Drop Down Menu 1.0.0
10. Vista FAT Partition Recovery 3.0.1.5
Labels: Download vista tools

Even the long-beloved Windows games (such as Solitaire and Minesweeper) have been redesigned and enhanced with better graphics and sound effects.
The following games are included with all Windows Vista editions:
*Freecell
*Hearts
*Minesweeper
*Purble Place
*Solitaire
*Spider Solitaire
The Internet games that were included with Windows XP have been removed from Windows Vista. You can, however, still access those games and more at http://zone.msn.com.
Purble Place game included with Windows Vista
Four new premium games are also included with Windows Vista Ultimate and Home Premium editions:
*Chess Titans
*Mahjong Titans
*InkBall
*Windows Hold'em (Ultimate only)
You can access all the Windows games from the Start menu:
1. Open the Start menu.
2. Click All Programs.
3. Click the Games directory.

Windows Vista Home Premium and Ultimate editions come with the Windows DVD Maker. This application allows you to create DVDs of video and photo slideshows to view from your TV. You can even create custom menus and play your favorite tunes during the slideshows. These DVDs can make irreplaceable keepsakes and gifts for the family.
You can access the Windows DVD Maker on the Start menu:
1. Open the Start menu.
2. Click All Programs.
3. Click Windows DVD Maker, as shown in Figure below
Opening Windows DVD Maker
You can even display the media from your computer to your TV, using a wireless or wired network and an additional piece of hardware called a Media Center Extender. You then can use Windows Media Center on your TV, just like you would in front of your PC. However, you can more practically display and present your pictures and videos, from the comfort of your living room.
You can choose from many brands of Media Center Extenders. You can use networked digital media players, such as an Xbox 360 or other digital media receivers (DMR) from brands like D-Link and Linksys.
Accessing Windows Media Center
You can open Windows Media Center from the Start menu:
1. Open the Start menu.
2. Click All Programs.
3. Click Windows Media Center.
Touring Windows Media Center
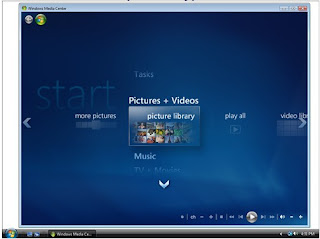
Windows Media Center will open to the main menu (shown in below figure), where you can choose the desired media type. You can use the arrows that appear when hovering on the top and bottom of the list to scroll through the media types. Then, you can use the left and right arrows to scroll through the options for the particular media type.

Windows Media Center.
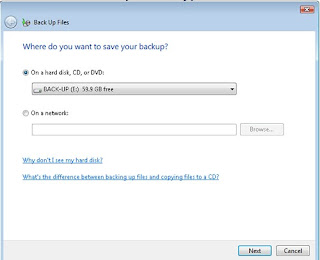
Your computer's system and program files, Windows settings, and applications are not included in the backup. This is because Windows Vista and your applications should be able to be reinstalled with your CDs and DVDs, whereas your personal files and documents might not be replaceable. If you do experience system problems or discover you accidentally deleted or modified a file, you can also use the restore functionality of Windows Automatic Backup.
Here's how to access the Windows backup features:
1. Open the Start menu.
2. Click Control Panel.
3. Double-click the Backup and Restore Center icon.
Vista SideShow is a new technology developed by Microsoft to enable real-time viewing of information, data, and media from your computer, on secondary displays and mobile devices. For example, you could check your email, contacts, and appointments without turning on your main computer.
Windows SideShow is available in all Vista editions except Home Basic.
Compatible Devices
Devices and products compatible with this technology should have a Windows SideShow logo displayed on the box.
The following are a few examples of devices that could support Vista SideShow:
1. Laptop lid displays, as shown in Figure below:
Example of a laptop with external Windows SideShow-compatible display; courtesy of ASUS Computer, Inc.
2. Keyboards
3. Mobile phones
4. Digital picture frames
Gadgets
Gadgets (or add-ons) give Windows SideShow devices their functionality. Windows Mail and Windows Media Player are two gadgets that are automatically included with Windows Vista. Using the Windows Mail gadget, for example, allows you to view your email messages from Windows Mail on your Windows SideShow device.
There are many more gadgets you can install for additional functionalities, such as the following:
- Picture viewers.
- Weather applications (such as WeatherBug).
- Feed and RSS readers.
- Support for email services (such as GMail).
- Stock market tickers

Keep in mind that the compatibility of gadgets is dependent upon the Windows Vista SideShow device.
Installing and Setting Up Devices
For Windows SideShow devices separate from your computer, you must install/set up the device with your computer. You should follow the vendor or manufacturer directions. Then after the device installation, you can customize your device and configure the gadgets.
Here's how to access the Windows SideShow settings:
1. Open the Start menu.
2. Click Control Panel.
3. Double-click the Windows SideShow icon.
Labels: install vista, Tutorial, vista repair, vista tips and trick
Example of viewing the desktop of a participant in a Windows Meeting Space session.

Figure Notes:
1. Remote PC's desktop
Labels: install vista, Tutorial, v, vista firewall, vista repair, vista tips and trick
Windows HotStart is another feature gained from the Windows Mobility Center. This allows you to specify HotStart buttons on your mobile computer to open particular media files or applications. HotStart buttons can even be used when the computer is sleeping, hibernating, or off, enabling quick access to media and applications, while saving battery life.
Here's how to access the Windows Mobility Center:
1. Open the Start menu.
2. Click Control Panel.
3. Double-click the Windows Mobility Center icon.
Example of Tablet PC keyboard

You can access the Tablet PC tools on the Start menu:
1. Open the Start menu.
2. Click All Programs.
3. Click Accessories.
4. Click the Tablet PC directory.

Figure Notes:
- Hover over applications for the live thumbnails.
- Translucent title bars.
- Press Alt+Tab for live thumbnails of opened applications.
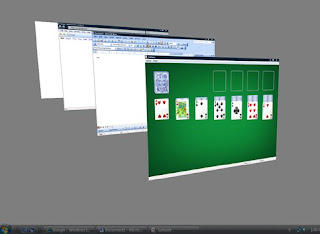
Another feature gained when using Windows Aero is Windows Flip 3D, which offers a method to quickly switch among opened windows and applications. As you can see in below figures , it gives you live images of the windows you can flip through.
Example of Flip 3D in Vista

Unlike earlier versions of Windows, Vista includes photo and video organization and editing software, called Windows Photo Gallery. This is particularly handy for families with digital cameras and camcorders. Although it might not include all the bells and whistles third-party software packages might offer, it can help you organize and show off those digital photos and videos you probably have scattered about your hard drive.
This figure tell us the following bullets give you a look into the main functions of Windows Photo Gallery.
Example of Windows Photo Gallery
Figure Notes:
1.Click here to edit and enhance the selected photo.
2.Click here to print selected photos.
Viewing and organizing: You can effortlessly browse through your photos and videos in a Thumbnails view, navigating by assigned tags and ratings, date taken, folders, or simply all available media. Hovering over a photo or video will display a larger image for better viewing. In addition, double-clicking on them brings them into the dedicated viewer and is where you can assign the tags and ratings. You can also organize the photos into separate folders by right-clicking on the folders and creating subfolders.
Fix: Selecting a photo and clicking the Fix button allows you to fine-tune the image by adjusting exposure and color, cropping, and removing red eye. In addition, an auto adjust feature can make automated enhancements.
Print: Windows Photo Gallery doesn't just offer simple photo printing; it can automatically adjust for printing various sizes, including 4x6, 5x7, 8x10, and wallets. Simply choose a photo (or multiple photos), select the Print menu, and click Print to get started.
Make CD and DVD movies: Windows Photo Gallery makes it easy to export photos and videos to Windows Movie and DVD makers. This allows you to create movies and presentations of images and clips, which make incredible keepsakes and gifts. You can either select particular media and choose Data-disc or Video DVD from the Burn menu, or click the Make a Movie button.
You can use Instant Search via many locations and Windows applications, such as:
- Start menu.
- Windows Explorer and Computer.
- Windows Photo Gallery (see Figure 3.14)
Figure 3.14. Instant Search box in Photo Gallery.

figure Notes:
1.Type your search terms here and press Enter.
Figure 3.15. Example of using Live Search in Internet Explorer 7.

Accessing the Network and Sharing Center
You can access the Network and Sharing Center via many methods:
A. Right-click on the Network Status icon in the system tray, as shown in Figure 3.9.
Figure 3.9. Accessing the Network and Sharing Center via the Network Status icon.
Figure Notes:
1.Right-click on the Network Status icon in the system tray...
2...and select Network and Sharing Center.
B. Double-click on the Network Status icon in the system tray.
C. Double-click on the Network and Sharing Center icon in Control Panel.
D. Click on the Network and Sharing Center button on the toolbar when viewing your network, as shown in Figure 3.10.
Figure 3.10. Accessing the Network and Sharing Center via the Network window.

Touring the Network and Sharing Center
Figure 3.11. Example of the Network and Sharing Center.

Figure Notes:
1.Depiction of the network
2.Click here to customize the network settings.
3.Sharing and discovery status
Next, you're provided with the status of all the main sharing and discovery settings and the ability to make quick changes, which is a big enhancement from XP.
Another exceptional improvement is the set of links (see Figure 3.12) at the bottom of the window, showing all the files and folders your account and computer are sharing on the network.
Figure 3.12. Links in Network and Sharing Center.
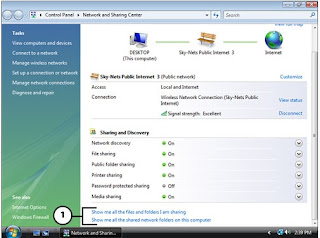
Figure Notes:
1.Click these links to see what you're sharing.
New Network Classification Scheme
In Windows Vista, the first time you connect to a network, you must classify its location/type: Home, Work, or Public (see Figure 3.13).
Figure 3.13. Example of pop-up window to classify network type.

Support for Nonbroadcasting Wireless Networks
Instead of having to manually add a nonbroadcasting wireless network to the preferred network list to connect, all you have to do in Vista is select the Unnamed Network, click Connect, and enter the SSID when prompted (and enter the security key if encryption is enabled).
You might think that this degrades the security that hidden networks offer; however, the SSID is still needed to connect to the network. In addition, not broadcasting your SSID doesn't offer a whole lot of security anyway.

Windows Vista includes Windows Firewall, just as Windows XP offered, which provides protection against hackers and Internet attacks by regulating inbound and outbound Internet access. Windows Vista, though, offers even more protection from Internet attackers and pests with anti-spyware and adware software called Windows Defender.
Notes:You can also use Windows Defender on Windows XP computers running Service Pack 2.To download, go to www.microsoft.com/downloads and search/browse for Windows Defender.
Accessing the Security Tools
Here's how to access Windows Security Center:
- Open the Start menu.
- Click Control Panel.
- Double-click the Security Center icon.
Figure 3.10. Example of the first screen of Windows Security Center.

Figure Notes:
1.Status of security components
2.Links to access individual security components
You can also independently access Windows Defender and Windows Firewall via their icons in the Control Panel.
Touring Windows Defender
After Windows Defender is opened, you can quickly see the status of the program, such as the date of the last update and scan. Figure 3.6 shows an example.
Figure 3.6. Example of Windows Defender.
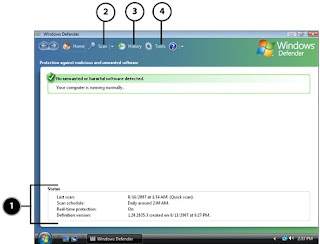
Figure Notes:
1.Status information
2.Click here for a Quick scan or use arrow for Full System or Custom scans.
3.Click here to see details of past scans and alerts.
4.Click here to change Windows Defender options.
The History page, accessed via the History button (shown in Figure 3.6), displays the details of past actions, such as scans and alerts.
Clicking on the Tools button (shown in Figure 3.6) gives you access to settings and items such as automatic scanning and action preferences, scanning exclusions, and quarantined items.
Touring Windows Firewall
Figure 3.7. Example of Windows Firewall.
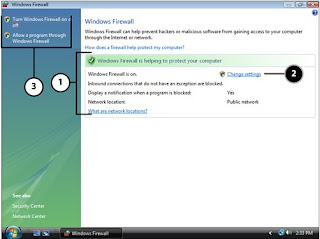
Figure Notes:
1.Status information
2.Click here to configure settings.
3.Shortcuts to settings
Figure 3.8. Change Windows Firewall settings here.
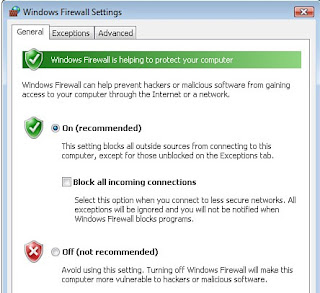
Controlling Capabilities
Vista's parental controls are a far cry better than those found in XP:
1. Windows Vista web filter
- Allows you to use automatic web content filtering options, including High, Medium, None, and Custom. Choosing Custom allows you to filter based upon desired categories such as Drugs, Tobacco, Pornography, and Bomb Making.
- Allows you to block certain websites and provides options to override automatic web content filtering options if the user is on the allow list.
- Allows you to block file downloads.
- Allows you to specify exactly (hour by hour) when the user can be logged on to the computer
- Allows you to specify whether the user can play games.
- Allows you to block or allow games by ratings (such as Everyone, Teen, and Mature) and content types (such as Crude Humor, Blood, Language, and Online Games).
- Allows you to block or allow specific games, regardless of its rating.
- Allows you to choose which programs any user on your computer can use; for instance, you might allow your spouse to run any program, but limit your children to only specific programs of your choosing.
Monitoring Capabilities
Figure 3.2. Example of a computer activity summary for a parental control–enabled user.

Here's a review of all the items contained in an activity report:
1. Web browsing
- Most commonly and most recently visited websites.
- Websites that were blocked because of restrictions imposed by Vista's parental controls.
- Web overrides permitting a restricted action and which administrator allowed it.
- Downloaded files (filename and location on your computer)
- Date, time, and duration of account sessions
- Recently used or blocked programs.
- Overrides permitting a restricted action and which administrator allowed it
- Games played on your computer, including duration of gaming session and rating of the game
- Received emails, including pertinent details of each message.
- Sent emails, including pertinent details of each message.
- Changes to contact lists along with the details
- General instant messaging sessions.
- Web Cam and audio messaging sessions.
- Messaging in games.
- Files and links exchanged during instant messaging sessions.
- SMS messages sent to mobile phones.
- Changes to contact lists along with the details
- Media (music, movies, and so on) that were played, including details such as song and album titles and their ratings
- Setting changes with details such as which accounts apply to the change and which account performed the change.
- Changes to Windows account settings, including details such as what was changed and which account made the change.
- Changes to the system clock.
- Failed logon attempts
Accessing the Parental Controls
The parental controls can be accessed via the icon in Control Panel.
The Parental Controls screen, as shown in Figure 3.3, will appear listing the Windows accounts, along with a few global tasks on the left and a link to create additional users.
Figure 3.3. First screen after opening parental controls.
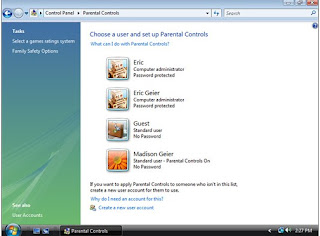
Clicking on an account will open another screen, as shown in Figure 3.4, to edit its individual parental control settings.
Figure 3.4. Screen showing a user's parental control settings.

Figure 2.8 shows examples of the new taskbar, Start menu, and Windows Sidebar.

Figure Notes:
1.Redesigned Start menu
2.Taskbar with the new Vista shiny black color scheme
3.New Windows Sidebar feature
4.Start button
Taskbar
Another major change to the taskbar is the Start button. The usual button containing the word start has been replaced with a Windows logo, which you can see in Figure 2.9. If your system is capable of running the new Aero interface, Vista offers the use of live thumbnails, which provide a preview of the open document or application, simply by hovering your mouse over an application in the taskbar.
Figure 2.9. Example of the taskbar live thumbnails.

Figure Notes:
1.Hovering your mouse over an application in the taskbar...
2....shows a live preview, making it easier to determine the contents of each open file.
Start Menu
If you are a fan of the Run prompt from previous versions of Windows, you might be disappointed because it's not included on the Start menu by default. You can, however, use the Search box to run commands like you would with the Run applet found in other versions of Windows. Nevertheless, the Run prompt can be accessed in the Accessories section of the Start menu and can also be added back onto the Start menu if you choose.
Another notable change you'll discover after seeing the Start menu is that the word My has been dropped from the names of common items and directories. For example, "My Computer" is now simply "Computer" and "My Network Places" is just "Network." In addition, the My Documents folder is now named after the Windows user and You can also add these icons (such as Computer and Network) to your desktop.
You'll also likely notice the Turn Off Computer and Log Off buttons have been removed and replaced with other options. The first button on the left, indicated by the power symbol, will put the PC into Sleep mode. Similar to Stand By mode in previous versions of Windows, Sleep mode powers down most of the PC and puts the session into memory so you can resume right where you left off.
The button with the lock will, of course, lock your PC. This option is best used when you want to secure your PC when leaving for short durations. To resume use of the PC, you must press Ctrl+Alt+Delete and enter the Windows account password.
Finally, the other shutdown options are accessible when hovering over the arrow on the right. Figure 3.0 shows an example.
Figure 3.0. New location for the power options in Windows Vista.

Figure Notes:
1.Enable Sleep mode.
2.Lock your PC.
3.Click here for power options.
Desktop
Other than the slightly larger default icon size (Figure 3.1 shows an example), not much has changed with the actual desktop.
Figure 3.1. Comparison of Windows XP and Vista default icons.
Figure Notes:
1.Icons in Windows XP
2.Icons in Windows Vista
Windows Sidebar


