
Unlike earlier versions of Windows, Vista includes photo and video organization and editing software, called Windows Photo Gallery. This is particularly handy for families with digital cameras and camcorders. Although it might not include all the bells and whistles third-party software packages might offer, it can help you organize and show off those digital photos and videos you probably have scattered about your hard drive.
This figure tell us the following bullets give you a look into the main functions of Windows Photo Gallery.
Example of Windows Photo Gallery
Figure Notes:
1.Click here to edit and enhance the selected photo.
2.Click here to print selected photos.
Viewing and organizing: You can effortlessly browse through your photos and videos in a Thumbnails view, navigating by assigned tags and ratings, date taken, folders, or simply all available media. Hovering over a photo or video will display a larger image for better viewing. In addition, double-clicking on them brings them into the dedicated viewer and is where you can assign the tags and ratings. You can also organize the photos into separate folders by right-clicking on the folders and creating subfolders.
Fix: Selecting a photo and clicking the Fix button allows you to fine-tune the image by adjusting exposure and color, cropping, and removing red eye. In addition, an auto adjust feature can make automated enhancements.
Print: Windows Photo Gallery doesn't just offer simple photo printing; it can automatically adjust for printing various sizes, including 4x6, 5x7, 8x10, and wallets. Simply choose a photo (or multiple photos), select the Print menu, and click Print to get started.
Make CD and DVD movies: Windows Photo Gallery makes it easy to export photos and videos to Windows Movie and DVD makers. This allows you to create movies and presentations of images and clips, which make incredible keepsakes and gifts. You can either select particular media and choose Data-disc or Video DVD from the Burn menu, or click the Make a Movie button.
You can use Instant Search via many locations and Windows applications, such as:
- Start menu.
- Windows Explorer and Computer.
- Windows Photo Gallery (see Figure 3.14)
Figure 3.14. Instant Search box in Photo Gallery.

figure Notes:
1.Type your search terms here and press Enter.
Figure 3.15. Example of using Live Search in Internet Explorer 7.

Accessing the Network and Sharing Center
You can access the Network and Sharing Center via many methods:
A. Right-click on the Network Status icon in the system tray, as shown in Figure 3.9.
Figure 3.9. Accessing the Network and Sharing Center via the Network Status icon.
Figure Notes:
1.Right-click on the Network Status icon in the system tray...
2...and select Network and Sharing Center.
B. Double-click on the Network Status icon in the system tray.
C. Double-click on the Network and Sharing Center icon in Control Panel.
D. Click on the Network and Sharing Center button on the toolbar when viewing your network, as shown in Figure 3.10.
Figure 3.10. Accessing the Network and Sharing Center via the Network window.

Touring the Network and Sharing Center
Figure 3.11. Example of the Network and Sharing Center.

Figure Notes:
1.Depiction of the network
2.Click here to customize the network settings.
3.Sharing and discovery status
Next, you're provided with the status of all the main sharing and discovery settings and the ability to make quick changes, which is a big enhancement from XP.
Another exceptional improvement is the set of links (see Figure 3.12) at the bottom of the window, showing all the files and folders your account and computer are sharing on the network.
Figure 3.12. Links in Network and Sharing Center.
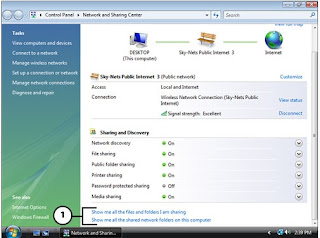
Figure Notes:
1.Click these links to see what you're sharing.
New Network Classification Scheme
In Windows Vista, the first time you connect to a network, you must classify its location/type: Home, Work, or Public (see Figure 3.13).
Figure 3.13. Example of pop-up window to classify network type.

Support for Nonbroadcasting Wireless Networks
Instead of having to manually add a nonbroadcasting wireless network to the preferred network list to connect, all you have to do in Vista is select the Unnamed Network, click Connect, and enter the SSID when prompted (and enter the security key if encryption is enabled).
You might think that this degrades the security that hidden networks offer; however, the SSID is still needed to connect to the network. In addition, not broadcasting your SSID doesn't offer a whole lot of security anyway.

Windows Vista includes Windows Firewall, just as Windows XP offered, which provides protection against hackers and Internet attacks by regulating inbound and outbound Internet access. Windows Vista, though, offers even more protection from Internet attackers and pests with anti-spyware and adware software called Windows Defender.
Notes:You can also use Windows Defender on Windows XP computers running Service Pack 2.To download, go to www.microsoft.com/downloads and search/browse for Windows Defender.
Accessing the Security Tools
Here's how to access Windows Security Center:
- Open the Start menu.
- Click Control Panel.
- Double-click the Security Center icon.
Figure 3.10. Example of the first screen of Windows Security Center.

Figure Notes:
1.Status of security components
2.Links to access individual security components
You can also independently access Windows Defender and Windows Firewall via their icons in the Control Panel.
Touring Windows Defender
After Windows Defender is opened, you can quickly see the status of the program, such as the date of the last update and scan. Figure 3.6 shows an example.
Figure 3.6. Example of Windows Defender.
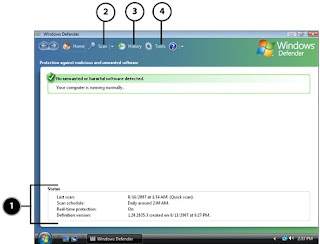
Figure Notes:
1.Status information
2.Click here for a Quick scan or use arrow for Full System or Custom scans.
3.Click here to see details of past scans and alerts.
4.Click here to change Windows Defender options.
The History page, accessed via the History button (shown in Figure 3.6), displays the details of past actions, such as scans and alerts.
Clicking on the Tools button (shown in Figure 3.6) gives you access to settings and items such as automatic scanning and action preferences, scanning exclusions, and quarantined items.
Touring Windows Firewall
Figure 3.7. Example of Windows Firewall.
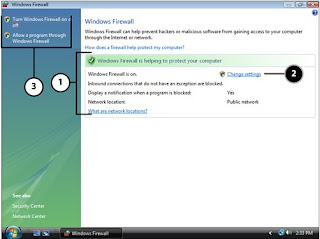
Figure Notes:
1.Status information
2.Click here to configure settings.
3.Shortcuts to settings
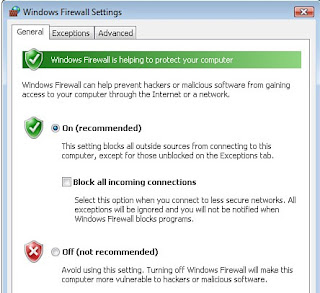
Figure 3.8. Change Windows Firewall settings here.
Controlling Capabilities
Vista's parental controls are a far cry better than those found in XP:
1. Windows Vista web filter
- Allows you to use automatic web content filtering options, including High, Medium, None, and Custom. Choosing Custom allows you to filter based upon desired categories such as Drugs, Tobacco, Pornography, and Bomb Making.
- Allows you to block certain websites and provides options to override automatic web content filtering options if the user is on the allow list.
- Allows you to block file downloads.
- Allows you to specify exactly (hour by hour) when the user can be logged on to the computer
- Allows you to specify whether the user can play games.
- Allows you to block or allow games by ratings (such as Everyone, Teen, and Mature) and content types (such as Crude Humor, Blood, Language, and Online Games).
- Allows you to block or allow specific games, regardless of its rating.
- Allows you to choose which programs any user on your computer can use; for instance, you might allow your spouse to run any program, but limit your children to only specific programs of your choosing.
Monitoring Capabilities
Figure 3.2. Example of a computer activity summary for a parental control–enabled user.

Here's a review of all the items contained in an activity report:
1. Web browsing
- Most commonly and most recently visited websites.
- Websites that were blocked because of restrictions imposed by Vista's parental controls.
- Web overrides permitting a restricted action and which administrator allowed it.
- Downloaded files (filename and location on your computer)
- Date, time, and duration of account sessions
- Recently used or blocked programs.
- Overrides permitting a restricted action and which administrator allowed it
- Games played on your computer, including duration of gaming session and rating of the game
- Received emails, including pertinent details of each message.
- Sent emails, including pertinent details of each message.
- Changes to contact lists along with the details
- General instant messaging sessions.
- Web Cam and audio messaging sessions.
- Messaging in games.
- Files and links exchanged during instant messaging sessions.
- SMS messages sent to mobile phones.
- Changes to contact lists along with the details
- Media (music, movies, and so on) that were played, including details such as song and album titles and their ratings
- Setting changes with details such as which accounts apply to the change and which account performed the change.
- Changes to Windows account settings, including details such as what was changed and which account made the change.
- Changes to the system clock.
- Failed logon attempts
Accessing the Parental Controls
The parental controls can be accessed via the icon in Control Panel.
The Parental Controls screen, as shown in Figure 3.3, will appear listing the Windows accounts, along with a few global tasks on the left and a link to create additional users.
Figure 3.3. First screen after opening parental controls.
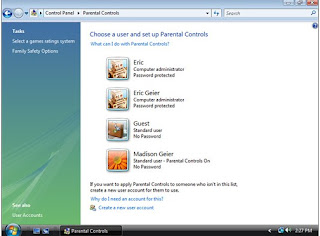
Clicking on an account will open another screen, as shown in Figure 3.4, to edit its individual parental control settings.
Figure 3.4. Screen showing a user's parental control settings.

Figure 2.8 shows examples of the new taskbar, Start menu, and Windows Sidebar.

Figure Notes:
1.Redesigned Start menu
2.Taskbar with the new Vista shiny black color scheme
3.New Windows Sidebar feature
4.Start button
Taskbar
Another major change to the taskbar is the Start button. The usual button containing the word start has been replaced with a Windows logo, which you can see in Figure 2.9. If your system is capable of running the new Aero interface, Vista offers the use of live thumbnails, which provide a preview of the open document or application, simply by hovering your mouse over an application in the taskbar.
Figure 2.9. Example of the taskbar live thumbnails.

Figure Notes:
1.Hovering your mouse over an application in the taskbar...
2....shows a live preview, making it easier to determine the contents of each open file.
Start Menu
If you are a fan of the Run prompt from previous versions of Windows, you might be disappointed because it's not included on the Start menu by default. You can, however, use the Search box to run commands like you would with the Run applet found in other versions of Windows. Nevertheless, the Run prompt can be accessed in the Accessories section of the Start menu and can also be added back onto the Start menu if you choose.
Another notable change you'll discover after seeing the Start menu is that the word My has been dropped from the names of common items and directories. For example, "My Computer" is now simply "Computer" and "My Network Places" is just "Network." In addition, the My Documents folder is now named after the Windows user and You can also add these icons (such as Computer and Network) to your desktop.
You'll also likely notice the Turn Off Computer and Log Off buttons have been removed and replaced with other options. The first button on the left, indicated by the power symbol, will put the PC into Sleep mode. Similar to Stand By mode in previous versions of Windows, Sleep mode powers down most of the PC and puts the session into memory so you can resume right where you left off.
The button with the lock will, of course, lock your PC. This option is best used when you want to secure your PC when leaving for short durations. To resume use of the PC, you must press Ctrl+Alt+Delete and enter the Windows account password.
Finally, the other shutdown options are accessible when hovering over the arrow on the right. Figure 3.0 shows an example.
Figure 3.0. New location for the power options in Windows Vista.

Figure Notes:
1.Enable Sleep mode.
2.Lock your PC.
3.Click here for power options.
Desktop
Other than the slightly larger default icon size (Figure 3.1 shows an example), not much has changed with the actual desktop.
Figure 3.1. Comparison of Windows XP and Vista default icons.
Figure Notes:
1.Icons in Windows XP
2.Icons in Windows Vista
Windows Sidebar
Figure 2.2. Windows Vista installation install screen.
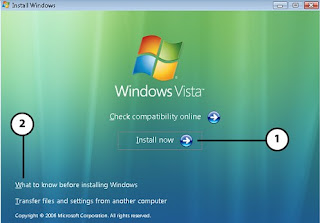
2. Click Install Now. The product key screen (see Figure 2.3) appears.
Figure 2.3. Windows Vista installation product key screen.

3. If the updates screen (see Figure 2.4) appears, choose an option to continue.

2. Click here to skip the updates (though you should update Vista
as soon as you get it installed if you skip it here).
It's best to get the Windows updates now in case you don't remember to do so later. The updates contain fixes and patches that address found bugs, issues, and security holes.
4. Type your product key into the field and click Next. The license terms screen
appears.
5. Review the terms, check the I Accept the License Terms option, and click
next the installation type screen appears.
6. Choose the appropriate type of installation to perform an in place installation,select Upgrade.To perform a clean installation, choose Custom (Advanced).
7. If you select Custom (Advanced), you will see a screen on which you are asked to choose which hard disk or partition you want to install Vista.
Select where you want to install Windows Vista (and make any desired changes to your drives and partitions) and click Next.
8. After you're done choosing and/or setting up partitions, click Next to continue. The installation will begin.
After Windows Vista has been installed, you'll need to do the initial setup:
1. First, you're prompted (see Figure 2.5) to create a user account. Type a user name and, if desired, a password, and click Next.


4. Next you're prompted to review/set the time and date settings. If needed, select the correct settings and click Next.
5. If the PC is connected to a network, you're prompted to specify its type/location.
Figure 2.7. Specifying a network's type/location during the Windows Vista installation.

Here's The Steps:
1. Use Windows Vista Upgrade Advisor
If you find that the location of the Upgrade Advisor has changed from the address given, you can visit the Microsoft Windows main website (www.microsoft.com/windows), browse to the Windows Vista section, and find a link to the Upgrade Advisor.
2. Check the System Requirements and Recommendations
First, you can take a look at the bare-minimum system requirements to install and run Windows Vista:
- 800MHz processor
- 512MB of memory (RAM)
- 20GB hard drive with at least 15GB of available space
- Support for Super VGA graphics
- CD-ROM drive
2. Verify Audio Card
Of course, I recommend that you check first so that you know what to expect when you install Vista.
3. Check PC Peripherals and Accessories
Whether you are upgrading an existing PC or you're planning to purchase a new system preloaded with Vista, you should check that your accessories and/or peripherals (such as printers, scanners, network adapters, and music players) will work with Windows Vista.
First, you can check the Microsoft list of supported components at the following website: http://winqual.microsoft.com/hcl/
4. Verify Software Applications Are Vista Compatible
You can reference the following lists that Microsoft supplies to see if your applications are supported:
Certified for Windows Vista:
https://winqual.microsoft.com/member/softwarelogo/certifiedlist.aspx
Works with Windows Vista:
https://winqual.microsoft.com/member/softwarelogo/workswithlist.aspx
If the application isn't listed, you can also check the publisher's/vendor's website for information on the product's Windows compatibility before giving up.
5. Move to a New PC Preloaded with Windows Vista
Compare Vista Editions
- Home Basic: Includes only the new basic features and is best for light home use on PCs meeting only the minimal system specs.
- Home Premium: Allows home/small-office PC users to take advantage of new effects and enhancements to the desktop and special mobility and entertainment features. This edition is best suited for newer PCs that exceed minimum system specs and for those users who use their computers daily.
- Business: Comes with better backup and restore features than home editions; however, instead of the entertainment applications, it includes more business applications, such as Remote Desktop Connection and Windows Fax and Scan.
- Ultimate: For power users in homes and businesses, this edition provides even better data protection tools and desktop enhancements. This edition is a good choice for those wanting the business features without sacrificing the entertainment applications.
- Enterprise: Includes additional tools and features specifically for large businesses with complex computer and technology systems. This edition of Vista isn't realistically available to consumers; it's only available to Volume License customers who have PCs covered by Microsoft Software Assurance.
Full or Upgrade Version
Notes: If you have more than one PC on which you want to install Windows Vista, you might be able to purchase additional licenses (after buying your first Windows Vista package), which are a bit cheaper than buying another full Windows Vista package.
For more information, visit the vista website at:
www.microsoft.com/windows/products/windowsvista/buyorupgrade/addlicense


