By default in Windows XP, thumbnails for pictures are enabled when browsing the contents of your computer using My Computer or Windows Explorer. As you might know, the Thumbnails feature can come in handy when browsing through your digital photos and other images. Without the Thumbnails view, you have to open each image individually or use some type of photo software that provides thumbnail browsing.
Enabling thumbnails might affect your PC performance, making browsing through your files and folders a bit slower, which is worse on PCs loaded with lower memory. Therefore, if you don't need to browse through your pictures often or use photo software to view them, think about keeping the Thumbnails feature disabled.
The Thumbnails feature on Windows Vista is disabled by default. Nevertheless, you can easily enable this feature:
1. Double-click on the Computer (or My Computer) icon on your desktop.
If the Computer icon isn't on the desktop, open Windows Explorer by opening the Start Menu, clicking All Programs, choosing Accessories, and clicking Windows Explorer. By default, the Computer icon isn't displayed on the desktop. If you want to add this icon to the desktop
2. Click on the Organize button on your toolbar, and select Folder and Search Options. If your toolbar isn't visible, press one of the Alt buttons on your keyboard to make it appear.
3. Click on the View tab.
4. Uncheck the Always Show Icons, Never Thumbnails option. and then click OK to exit.
Labels: desktop, icons, Thumbnails, Tutorial, vista, vista tips and trick, Windows XP
If you want to use the new search capabilities of the Start menu, you might not want to change to the Classic Start menu, as you'll get rid of this new feature.
If you find it's hard to adapt to this new design, you can apply the Classic Start menu:
1. Right-click on the taskbar and select Properties
2. Click the Start Menu tab.
3. Select the Classic Start menu option, and then click OK to exit.
Labels: icons, Start menu, Tutorial, vista, vista tips and trick, Windows Classic
1. Open the Start menu.
By default, the Network icon isn't displayed on the desktop. If you want to add this icon to the desktop
2. In the Search box, type "regedit", as shown in Figure 4.28, and then press Enter. If you are using the Windows Classic Start menu, you need to click Run, type "regedit", and then click OK.
Be very careful when editing the Windows Registry. Mistakes can cause major problems. By major, I mean everything from a program failing to start to your computer being made unusable. One false move in the Registry can spell disaster, so be careful!
It's also a good idea to make a backup copy prior to making any changes to the Registry. Here's how:
1. Open the Registry Editor by following steps 1 and 2.
2. In the Registry Editor, click File on the menu and select Export.
3. On the bottom of the dialog box, select the All option for the Export Range.
4. Browse, find, and select a location to save the registry. It's best to save it to a removable shortage device like a flash drive, floppy disc, or CD.
5. Enter your desired file name, such as Registry_Backup_DATE.
6. Click Save and wait until it's done which may take a few minutes.
3. Navigate to the following folder:
HKEY_CURRENT_USER\Software\Classes\Local Settings\Software\Microsoft\Windows\Shell\MuiCache
4. Locate and double-click on the following Registry entry:
@C:\Windows\system32\NetworkExplorer.dll,-1
5. Enter your desired name in the Value Data field, as shown in Figure 4.31, and click OK.
6. Close the Registry Editor.
7. To activate the new icon name, right-click anywhere on the desktop and select Refresh. The new icon name should now appear
Here's the simplest way to add the Internet Explorer icon to the desktop:
1. Open the Start menu.
2. Click and drag the Internet Explorer icon to the desktop
3. To get rid of the shortcut text, right-click on the icon, select Rename, and delete the word "Shortcut."
In creating a simple shortcut means you'll have the ugly arrow on the Internet Explorer icon, unlike the other main icons, such as Computer, Network, and Recycle Bin.
Be very careful when editing the Windows Registry. Mistakes can cause major problems. By major, I mean everything from a program failing to start to your computer being made unusable. One false move in the Registry can spell disaster, so be careful!
It's also a good idea to make a backup copy prior to making any changes to the Registry. Here's how:
1. Open the Registry Editor by following steps 1 and 2.
2. In the Registry Editor, click File on the menu and select Export.
3. On the bottom of the dialog box, select the All option for the Export Range.
4. Browse, find, and select a location to save the registry. It's best to save it to a removable shortage device like a flash drive, floppy disc, or CD.
5. Enter your desired file name, such as Registry_Backup_DATE.
6. Click Save and wait until it's done which may take a few minutes.
As you probably noticed, the only icon that's placed on the desktop by default in Windows Vista is the Recycle Bin. However, if you're used to the others (such as My Computer or My Network Places) being on the desktop, you can easily add the other main icons:
1. Right-click on your desktop and select Personalize 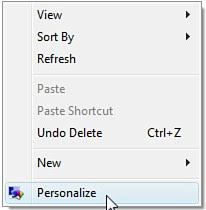
2. Click Change Desktop Icons in the tasks pane on the left ![]()
3. Check the icons you want to appear on the desktop, such as that shown in Figure below, and then click OK to exit.![]()
Labels: desktop, Recycle Bin, Tutorial, vista, vista tips and trick
The first task in getting rid of the Vista look and feel is applying the Windows Classic theme:
1. Right-click on your desktop and select Personalize

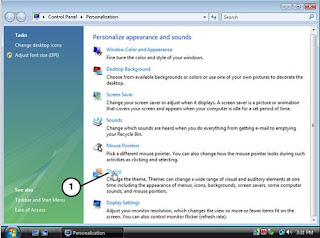
2. Click on Theme
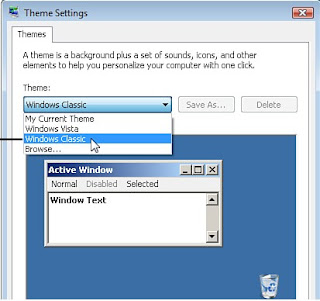
3. Select Windows Classic from the drop-down list,see figure below and then click OK to exit.
Here's how to disable Windows Sidebar:
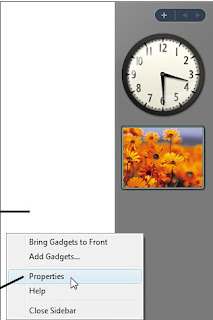
1. Right-click on Sidebar Windows and select Properties, as shown in Figure below
2. Uncheck the Start Sidebar when Windows Starts option,
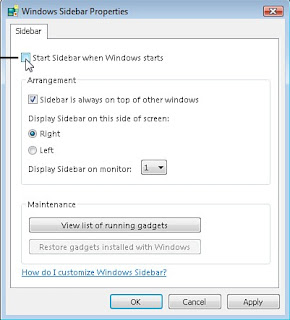
3. Click OK.
If you want to simply close Windows Sidebar without disabling it from coming up at startup, just right-click on the Sidebar and click Close Sidebar.
Labels: gadgets, Tutorial, vista tips and trick, Welcome Center, Windows Sidebar
 The language packs offered by Microsoft for Windows Vista Ultimate allow you to set the entire interface of Windows to another language. It is even user account specific, so you can set different languages for the individual users on the same PC.
The language packs can be downloaded from the Windows Ultimate Extras section on the Windows Update website:
www.update.microsoft.com
Here's how to access the language settings (such as to remove a language pack):
1. Open the Start menu.
2. Click Control Panel.
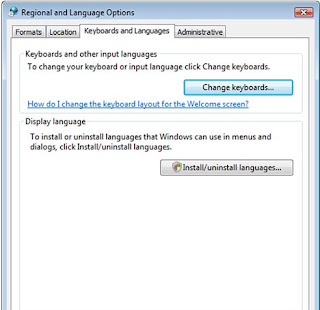
3. Double-click the Regional and Language Options icon.
4. Click the Keyboards and Languages tab.
5. Refer to the Display language section,
Labels: language packs, Microsoft, Tutorial, vista ultimate edition
For example, when you accidentally save over a file or notice you've made changes to files that you now regret, you can easily revert to other saved versions. A few clicks and the file will appear just as it did back when it was saved days or months ago.
Shadow Copy works in conjunction with System Protection, and its System Restore features. Therefore, System Protection must be enabled for Shadow Copy to work. Shadow copies of files are made when restore points are saved, typically every day.
The System Protection features are hard-drive independent; therefore, you would need to turn on System Protection for each hard drive and/or partition.
To access the System Protection settings, right-click the Computer icon on the Start menu or desktop, select Properties, and click the System Protection link under the Tasks pane on the left.
Here's how to access the Shadow Copy feature:
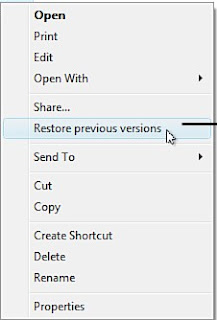
1. Right-click on the file or folder to restore.
2. Select Restore Previous Versions
Labels: fax, scan, vista, Vista Business, Windows XP
